|
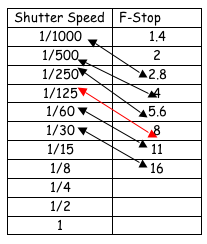
Copyright 2004, 2010, Mark D. Martin, All rights reserved [This article was originally a study guide written for 7th and 8th grade math students for a mini unit on photography and math. It incorporates many concepts taught in middle school math including some basic algebra, fractions, decimals, ratios, sequences, area of a circle, metric measurement, and measuring angles. Students had been taught all of these concepts before the unit. This unit helped them apply that knowledge to a real world setting. Students had a chance to experiment with vintage 35mm single lens reflex cameras. While the students worked with film cameras, all of the concepts apply to digital cameras also. While not covered in this article, middle school math is also abundant in additional digital photography concepts such as the pixel dimensions of the image sensor, the total number of pixels, and the aspect ratio of sensors. It is a very challenging unit for middle school students. The article is therefore also appropriate for adults. Many of the math concepts in photography are skimmed over in introductory photography texts. In particular, there is usually not a full explanation of the mathematical meaning of f-stops.] I. IntroductionA camera is a light tight box with a lens, or even a pinhole, at one end. At the other end of a digital camera is an electronic image sensor. Film, coated with light sensitive chemicals, is at the other end of a film camera. The lens is made up of one or more curved pieces of glass or plastic. The shape of the lens, and the material it is made of, causes light reflected from an object to bend or refract as it travels through the lens. This refraction causes an image to be formed as indicated in Figure 1. 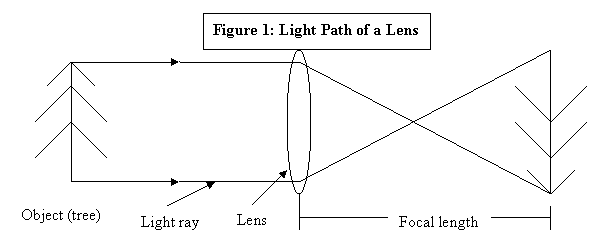 Just the right amount of light must hit the film. Cameras have a door which opens letting light hit the film or sensor and closes to stop the light from hitting the film or sensor. The amount of light hitting the film or sensor depends on how long that door is open and how big the door is. The door is called the shutter. The size of the door is called the aperture. We will examine the shutter in Section II and the aperture in section III. In section IV we will examine the "focal length" of lenses and see how that affects aperture. II. Shutter SpeedsThe camera shutter is like a door which opens to let light in. Shutter speeds are the time the door or shutter remains open. Common shutter speeds in seconds are 1/1000, 1/500, 1/250, 1/125, 1/60, 1/30, 1/15, 1/8, 1/4, 1/2 and 1. Many cameras also have a B (Bulb) setting where the shutter stays open until you release the button. A common shutter speed is 1/125 second which is a tiny part of one second. In taking pictures of the night sky, however, photographers often use shutter speeds of several seconds, minutes or even hours. Shutter speed dials often use only the denominator instead of the entire fraction. Hence, 1,000 on a shutter speed dial means 1/1000 of a second. The shutter speeds form a geometric sequence. In moving from 1/1000 second towards 1 second each increase in shutter speed increases the time and the amount of light hitting the film by a factor of 2. The common ratio is hence 2. III. ApertureAperture Defined. The aperture is the diameter of the lens. In other words, the aperture is how big the door is. The larger the diameter, the more light that can pass through the lens. Cameras can actually change the size of their door or aperture. We will, therefore, first consider telescopes which do not change the size of their opening and are hence easier to understand. Telescopes need a large diameter to collect the light from distant objects in the sky. The diameter of the telescope lens is often much more important that its power or magnification. The price of telescopes increases as the lens diameter increases. Telescope Types. It is easier to make a large diameter curved mirror than it is to make a lens. Larger diameter telescopes therefore often use a curved mirror instead of a lens. The image is formed as shown in the diagram below. Telescopes that use mirrors are called reflecting telescopes. Telescopes using lenses are called refracting telescopes. 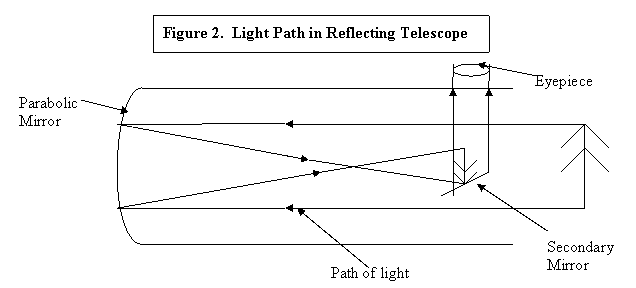 Area = Light Gathering Power. While the aperture is measured by the diameter of the lens or mirror, the light gathering power is determined by the area of lens or mirror. The area of a circle equals pi (Π) times the radius squared or Area = Π r2. A 60mm telescope has an area of Π r2 = Π 30mm2 = 2827mm2. (Radius = 1/2 diameter.) A 120mm telescope has an area of Π 120mm2 = Π(60mm)2 = 11,310mm2. While the diameter is double, the area and light gathering capacity goes up four times since area is calculated using the square of the radius. (11,310 divided by 2837 = 4)
On the test you should be able to determine the area of a lens with a given diameter. You should also be able to compare the area of lens of one diameter with the area of a lens of another diameter. Since we are comparing two quantities by division, we are finding a ratio. You should also be able to take into account the secondary mirror of a reflecting telescope. The secondary mirror is also round. The incoming light is blocked by the secondary mirror. My 6 inch reflecting telescope has a 1.5 inch seconding mirror. You calculate the effective light gathering area as follows: The area of a six inch diameter mirror is Π r2 = Π (3in)2 = 28.27 square inches. Subtract from this the area of a 1.5 inch diameter circle. Π r2 = Π (1.55in)2 = 1.77 in2 . 28.27 - 1.77 = 26.5 in2. You can also calculate the percentage loss due to the secondary mirror, 1.77 divided 28.27 = .063 = 6.3%, a relatively small loss. Designation of Aperture. The diameter of a telescope lens or mirror is usually given on the telescope, the box and/or the owner's manual. Binoculars are basically two small telescopes joined together. Binoculars have designations such as 7 x 35, 7 x 50, 10 x 50, or 3 x 21 on them. The first number is the magnification or power. The second number is the lens diameter in millimeters. Camera lenses also designate the aperture but in a more complex way. IV. Focal LengthFocal Length Described. Before we discuss the aperture of camera lenses, we must first consider another important characteristic of lenses, the focal length. The focal length can be thought of how long a lens is. Long lenses, like a photographer uses at a football game, makes things appear close up. Short lenses make things look further away but give you a wide angle of view. Now, let's get a little more technical. The focal length of a lens is the distance between the optical center of the lens and the points where a clear image is formed. This is shown in figure 1 repeated below. We measured the focal length of several magnifying glasses which are one piece, or "simple," lenses. A camera lens is usually composed of several individual lenses and is called a compound lens. The focal length of modern camera lenses and telescopes is usually measured in millimeters. Focal length is very important in photography. Short focal length lenses gives you a wide view and are called wide angle lenses. Longer focal length lenses have a narrow view and make things appear closer. They are called telephoto lenses. In between are normal lenses which have an angle of view similar to the human eye. 35mm cameras use film that is 35mm wide. Common wide angle focal lengths for 35mm cameras are 24mm, 28mm, and 35mm. Common normal focal lengths for 35mm cameras are 50mm and 55mm. Common telephoto lenses for 35mm cameras are 100mm, 135mm, 200mm, 300mm and 400mm. Zoom lenses are popular today. A zoom lens has a range of focal lengths. The photographer changes the focal length with a button on the camera or a ring on the lens. Examples of common zoom lenses for 35mm cameras are 28mm to 80mm, 70mm to 210mm and 100mm to 300mm.
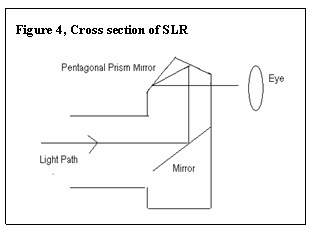
SLR Advantages. SLR cameras have two very important advantages over other camera types. First, SLR cameras allow you to see almost exactly what will hit the film or image sensor. This is especially important when taking photographs at a close distance. With a separate viewfinder, what you see in the viewfinder may be different that what the film or image sensor "sees" through the lens. Second, most SLR cameras allow you to change the lens giving you a wide variety of focal lengths to choose from. V. Adjustable Camera Apertures - f-stopsUnlike telescopes, you can adjust the aperture or diameter of many camera lenses as shown in Figure 5 using a ring on the lens or an electronic button. This is one of the two primary ways to get the proper amount of light hitting the film.
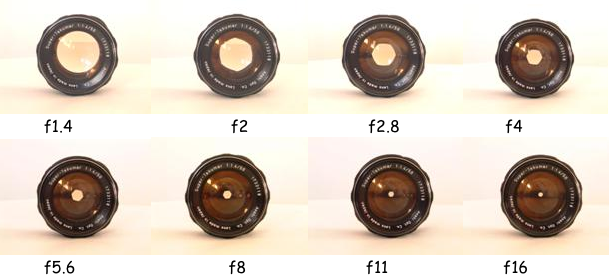 Figure 5: Adjustable Aperture Lens Relation Between Aperture and Focal Length. The numbers in figure 5 require considerable explanation. A larger aperture (diameter) results in more light. The amount of light is also related to focal length, however. Let's say you are taking a photograph of a wall 20m by 30m with a lens having a 28mm focal length and an aperture (diameter) of 14mm. Now stand at the same location and switch to a 55mm lens, approximately twice the focal length of a 28mm lens. Assume the 55mm lens has the same aperture or diameter. Now you will only see a portion of the wall 10m by 15m; half the distance for both dimensions. The area you see with the 55mm lens will be almost 4 times less than with the 28mm lens. 20m x 30m = 600m2. 10m x 15m = 150m2. 600 divided by 150 = 4. With 1/4 of the scene, you receive 1/4 the light even though both lens openings have an area of Π r2 = Π (7mm)2 = 154mm2.
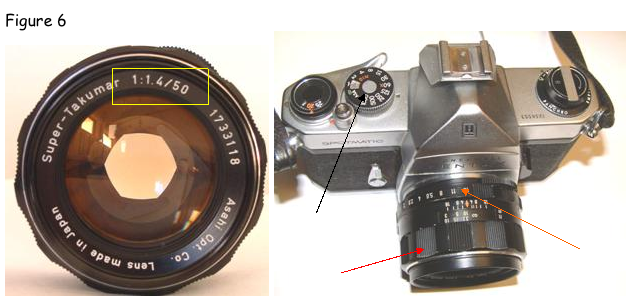
To get the same amount of light you need a lens opening with 4 times the area. 4 (154mm2) = 616mm2. Use Π r2 to find the radius needed. 616mm2 = Π r2. r2 = 616/Π. Taking the square root of both sides, r equals approximately 14mm or diameter equals 2r or 28mm. Therefore, to get the same amount of light as a 28mm focal length lens with a diameter of 14 mm, you need a 55mm lens with about twice the diameter or 28mm. f-stops. Relax! Photographers really don't calculate all of this to take a photograph. Instead, they use f-stops. Cameras use the following sequence of f-stop numbers: 1.4, 2, 2.8, 4, 5.6, 8, 11, 16, 22. This sequence seems pretty mysterious at first. We found out what it means, however, by finding the diameter and area for different focal length lenses. Let's find the diameter and area for various f-stops on the 28mm and 55mm lenses. 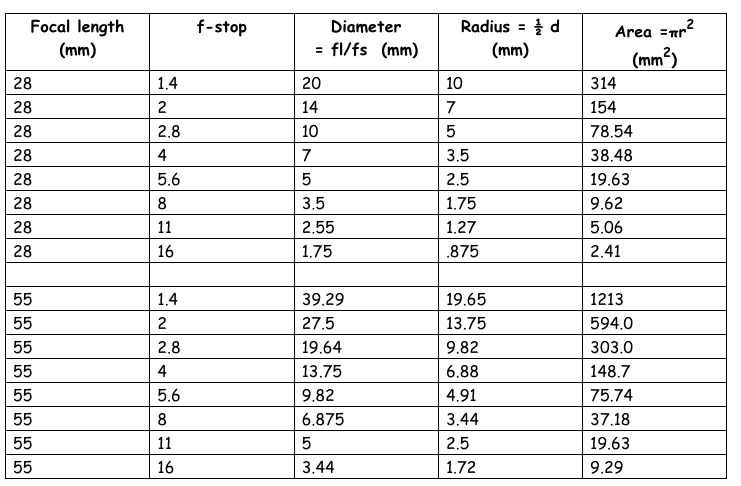 As the f-stop moves in the direction f1.4 to f16, the area, and hence the amount of light, is cut in half with each increasing f-stop number. It is hence a geometric ratio with the common ratio of 1/2. Conversely, moving in the direction of f16 to f1.4, the area, and hence the amount of light, doubles (increases by a factor of 2) with each decreasing f-stop number. It is hence a geometric ratio with a common ratio of 2. The f-stops and diameters are also geometric ratios decreasing or increasing by a factor of the square root of 2 or about 1.4 with each change of f-stop. The common ratio is the square root of 2 because the amount of light depends on area which changes by the square of radius. The table also shows that for a given f-stop, the area of the 55mm lens is about 4 times that of the 28mm. As explained above, however, the actual light hitting the film is the same since the 55mm lens takes in only 1/4 the scene that the 28mm lens takes in. On the test I will expect you to know how to use the equations Designation of Focal Length and Maximum f-stop. Figure 6 shows the front of a lens. The designation 1:1.4/50 means its focal length is 50mm and its maximum f-stop is 1.4. Figure 6 also shows an SLR camera with the focusing ring (red arrow) aperture ring (orange) and shutter speed dial (black) which we will learn about next.
 Correct Exposure with Shutter Speeds and f-stops. To get a photograph that is not too dark or not too light the photographer uses the f-stops and shutter speeds to control the amount of light hitting the film. The amount of light hitting the film is called the exposure. The photographer determines how much light is needed by using a light meter, suggestions on the box of film, or from experience. Since the mid 1960s most single lens reflex cameras have light meters inside them. The photographer can set the shutter speed and then move the aperture ring until a needle or light indicates the exposure is right. Conversely, the photographer can set the f-stop and then move the shutter speed dial until the needle or light indicates the correct exposure. Modern cameras will also generally have a setting that will automatically set a proper shutter speed and f-stop.
Why Two Controls Are Useful. Why do you need both shutter speed and f-stop settings? First, having both allows you to vary the light over a wide range. For example, 1/1000, f16 lets in very little light, while 1 second, f1.4 lets in a large amount of light. If you just had the shutter speeds or just had the f-stops, you would not have such a wide range.
Second, varying the shutter speed or aperture affects how the photograph looks. If you want to freeze action you can use a fast shutter speed of 1/1000, 1/500 or 1/250 of a second. Conversely, you might want to blur a fast moving subject to give the illusion of movement by using a slow shutter speed. You might also use a slow shutter speed with the camera mounted on a tripod to give a misty, feathery appearance to a waterfall. Aperture affects how much of the scene is in focus. If I use an f16 f-stop to take a photograph of a person's head with a bookcase behind them, both his or her head and the bookcase will be in focus. If I instead use an f2 f-stop, his or her head will be in focus but the books in the bookcase will not. I might want the books to be blurred if I am interested in viewers focusing their attention on the person's face rather than the books. This concept of how much is in focus is called depth of field. Many single lens reflex cameras allow you to close the aperture to the desired f-stop while looking through the viewfinder to visualize what the depth of field will be. This is called depth of field preview. Many lenses also have a scale on them that helps you determine the depth of field. VII. ISO RatingThere is one more geometric sequence with a common ratio of two that affects exposure - it's the film's ISO rating. Film usually has a designation with the letters ISO followed by a number. The number is usually 50, 100, 200, 400, 800, or 1600. This sequence forms a geometric ratio. Other ratings such as 64, 125, and 1,000 also occur. ISO stands for International Standards Organization. The ISO rating is a measure of how sensitive the film is to light. In the scale above, 50 is least sensitive and 1600 is most sensitive. 50 requires twice the exposure of 100, 100 requires twice the exposure of 200, and so forth. Therefore, if my light meter tells me to expose a photograph at 1/125, f8 with ISO 100 film, I can expose it at 1/250, f8 with ISO 200 film, or 1/500, f8 with ISO 400 film. Photographers say the higher numbers are "faster" films and the lower numbers are "slower" films. While "fast" films are good for low light or fast action, they tend to more expensive and may be have more "grain" or less resolution. On the test I might ask you to give me an equivalent exposure if I change the film ISO rating as in the example above. Also know that if you double the ISO rating, you must cut the exposure in half using either the shutter speed or f-stop. When digital cameras came out, they continued to use the ISO rating. Digital cameras allow you to select different ISO settings at any time. I can take one photo at ISO 100. On the next picture I can set the dial to ISO 200 and cut the exposure in half. Setting the dial to ISO 200 essentially increases the sensitivity of the image sensor to light. With film the only way to change the ISO was to change the film. Many modern digital single lens reflex cameras have ISO settings from ISO 100 to perhaps ISO 3200 or even more today. At higher ISO settings, however, the image quality may suffer with significant "noise," however. VIII. Modern SLRs and Digital CamerasThe cameras you used were from the 1960s and 1970s. Modern film SLRs work in the same way except they have more electronic controls, more automation and usually automatic focus in addition to manual focus. Modern film SLR cameras do not necessarily take better pictures, but they are more convenient. When I first wrote this in 2004, digital SLRs had just broken the $1,000 price level with the Canon Digital Rebel 6.3 mega pixel camera which was introduced in October 2003. Just a few years earlier digital SLRs could cost over $10,000 with much lower resolution. As a write the revised version of this article in 2010, you can buy a digital SLR with 10.2 megapixels for $400. A digital SLR with optical through the lens viewing works pretty much the same as a film SLR camera. All of the information in this article applies to both film and digital SLR cameras. IX. ConclusionIf you are interested in photography, but are confused by some of the math, don't let that stop your interest. You don't need to understand all the math here to enjoy photography. If you find the math interesting, but don't care for photography, enjoy the math. Photography uses a lot of middle school math concepts. In any event, read through this paper to prepare for the test. Pay particular attention to the "On the test" clues. Focus on the calculations we did in class. You will get to use this paper during the test. While this is a long paper, we have really just touched the surface of studying photography and math. For example, we have not discussed film processing and printing, or digital image manipulation. Finally, remember cameras are just tools. The true joy of photography is finding the light of God in the beauty of nature and the people around us. |
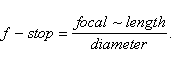 . We can also solve this for diameter.
 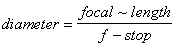 . F-stops are designed so that the same f-stop number on any lens results in the same amount of light hitting the film no matter what the focal length.